Thursday, December 31, 2009

Apature PRO Coworker Remote Release

As I am working on the portraiture section of my New York Institute of Photography Course, I found mention made of using a remote release for the shutter.  The goals in doing so were two-fold.  One, to permit the maximum amount of camera stability for the sharpest possible image, and also to permit eye contact between the photographer and subject to get a more relaxed demeanor on part of the one being photographed.


I considered the Canon RS-80N3 Remote Switch for my Canon 7d, which is a hard-wired release.  Online reviews showed purchasers to be nearly unanimous in praise for this accessory, and the simple design offered very little to go wrong.  However, I also noticed a selection of third-party products that provided the same functionality with the added benefit of being wireless.  Tempted by the wireless feature, I bought the Aputure Pro Coworker Wireless Remote Shutter from fotodiox, an Amazon Marketplace partner.

The  product arrived in three days and the box contained six items.  These included:

  • the remote transmitter,
  • the receiver,
  • batteries for each,
  • a cable to connect the receiver and camera body and
  • an instruction sheet.

The receiver takes two AAA-sized batteries.  The transmitter a 12V 23A.  I was not familiar with this last battery, and at first was concerned that finding replacements might be difficult.  Further review showed that this is a common size for various remotes, and they can be found locally and online.


The receiver is connected to the camera body by a short cord with a mini-plug on one end that goes into the transmitter and a camera body specific plug on the other.  The use of this cables permits Aputure to customize the remote for different types of cameras without requiring a custom design for each product.  Neither the documentation nor the company website reveal whether alternate cords could be purchased, thereby permitting a single remote to serve for multiple types of bodies.

The receiver has a shoe connector at its base, permitting you to attach it to the flash shoe to keep things neat.  The receiver is lightweight, and no problem appeared just letting the receiver dangle at the end of the cord.  This is important for me, since my flash shoe is usually occupied with my Cybersync CST transmitter for the flash.

I installed all the batteries, attached the receiver to the body and turned it and the body on.  The transmitter has a switch with two settings, one marked with a multiple frame icon, the other with a clock icon.  With the switch in the multiframe position the transmitted worked just like the shutter release on the 7d body.  A half-press would focus and set the exposure, while a full press fired the shutter.  If you put the body into multishot drive mode and held down the remote button then the body fired as fast as it could (which on the 7d is pretty fast!)  Switching the mode to the clock icon introduced a delay in the shot of about two seconds.  This delay was managed by the receiver, not the regular 2 or 10 second delay available via the camera body.

Playing with distance, the remote seemed to fire the body from anywhere within the house that I bothered to go.  It worked at distances of up to 75 feet and that going through multiple walls.

Both receiver and transmitter have a block of four DIP switches, which allow you sixteen channels for the radio signals.  I did not bother changing them off the defaults.

One very interesting feature of the system is that the receiver has a button on it just like the one on the transmitter.  This button provides the same remote release features, so you can use it as a corded remote release (although, one with a very short cord!) if the wireless remote were to fail.  This functionality works even if the receiver is turned off or even if the batteries are  removed!

Durability cannot be assessed yet, as this just arrived in house.  But everything feels solid and professional.  I will watch how performance and reliability play out over the upcoming months and update this review accordingly.

Saturday, December 26, 2009

Check out my wife's blog too

My wife, Jennifer has started a blog of her own.  She is taking classes learning to be a writer.  I convinced her to try her hand at blogging as a method of practice.  She is off to strong start and is having fun.  Check it out at : Dragonfly Yarns

Friday, December 25, 2009

Canon 7D Lens Adjustment

I was fortunate enough recently to be able to use some bonus funds to purchase a new camera. I have been using a Canon Digital Rebel (300D) since 2005. It still works great, but the 6-megapixel image size was a bit constraining, particularly when I wanted to crop in on an image that I framed one way when taking the picture, but decided would be better framed another way in post-processing. I dickered about quite a bit, but after encouragement from my Wife I finally went for the Canon 7D, semi-pro level camera.

When the camera arrived, I played around with it. At first, I was taken aback by what appeared to be focus issues. I realized that I was getting better focus manually than with the auto-focus. Then I remembered that more recent dSLRs permit one to tune the lens to the camera. I decided that this must be the issue I was facing, so what to do about it?

RawWorkflow.com has a product called LensAlign (http://www.lensalign.com/) which is designed for just this purpose. However, it was two days before Christmas, I wanted to use the new camera for gift opening and Christmas day shots and getting the product here in time was unreasonable. What could I do and do for cheap?

The LensAlign system is pretty straight-forward. There is a broad surface with high-contrast patterns on it that give the camera the greatest opportunity to focus at its finest. Oblique to that focusing plane is a "ruler" with distances marked. The zero point is exactly on the plane and the ruler makes about a 45 degree angle to the plane. The central idea is that the camera focuses on the plane, then you observe the ruler to find at what point the depth of field begins and at what point it ends. Tune the lens such that the depth of field surrounds the zero-point and you are good!

With time short, I went totally ghetto and jury-rigged a solution. A VHS tape case with a black and white illustration became the focusing target. I pressed into service a wooden yardstick to serve as the depth-of-field measure. Indirect light from a window illuminated the contraption, and I set to work. Using the tools at one distance (about 4 feet) I calibrated each of my four lenses. Final result, very nice! Much better auto-focusing, at least as good as my manual ability.

But, I was not satisfied that this was as well done as possible. I could think of a number of potential errors in the system:
  • Was the focusing target really of high-enough contrast?
  • Were the markings on the yard-stick of high-enough precision to accurately measure the depth-of-field?
  • I had adjusted the lens so that the depth-of-field range fell with the focus plane "in-between", but I had not made sure that it was in the location that is is supposed to be.


With a bit more work, I could address each of these. I needed a new focusing target, a new depth-of-field ruler and some information.

First, the focusing target. I broke out Google Sketchup 7 and pulled together a high-contrast checkered pattern to use for focusing. Beside that I drew a ruler with 1/8-inch graduations which are scaled 1.414-times oversize to account for the 45 degree tilt of the ruler. These I printed out and using a glue stick attached to a bit of cardboard scavenged from a packing box. I attached the ruler to the focusing plane by way of a long steel pin, making sure that the zero point on the ruler lined up with the surface of the plane.

That took care of getting a good target and measuring device, now to set to focus to exactly where it needs to be. The depth of field that a lens produces is a function of the focus distance, focal length, aperture and the sensor size. It is also not symmetric about the plane of focus, but rather has a smaller portion on the camera side of the the plane of focus and a larger portion on the background side. You can calculate the depth of field easily using a number of online tools, but the one I prefer is http://www.dofmaster.com/dofjs.html. Too narrow a depth-of-field and fine tuning would be difficult. To deep and it could exceed the length of the ruler. I decided to start with my Canon 50mm f/1.4. I decided that a depth of field of 3 inches would be good, for no good reasons beyond gut feel. The calculator told me that I would need to set the target 75 inches away from the camera to get a 2.99 inch depth of field. This seemed good enough for me. The calculator also told me that there would be 1/32 inch more depth-of-field behind the plane than in front. This was too small for me to worry about, so I planned on simply centering the field.

I attached the target to a light stand, put the camera on a tripod and aligned the two stands so that the center line of the lens fell perpendicular to the face of the target. I also made sure that the camera itself was level on the tripod. After each picture, I zoomed into the result image as close as possible and evaluated the level of focus at various points on the scale. Then I would adjust the lens adjustment some amount and take another shot. Repeat until the in-focus range falls equally on either side of the scale.

I readjusted three lenses, and the end result was that the three needed almost exactly the same amount. The 50mm f/1.4 and 100mm f/2.8 Macro both needed +13, the Tokina 17-50mm f/2.8 needed +12.

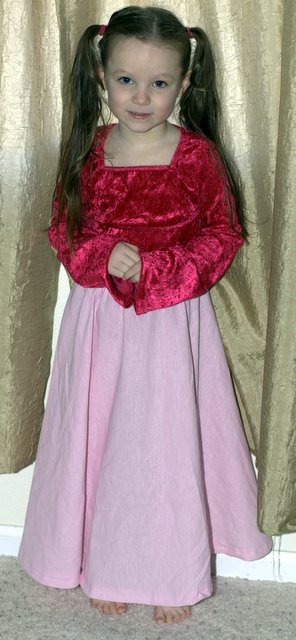
Christmas morning, everything was ready and the photos were acceptably sharp.

Friday, January 23, 2009

Audiobooks of 2008

My commute is long (relatively speaking for Northern Colorado, at least) and I mitigate the mental slack time with audio books. Most of these are thanks to Overdrive (http://www.overdrive.com/products) through my local library. 2008 saw me through the following works:

Edith Wharton
Age of Innocence

Lucy Maud Montgomery
Anne of Green Gables
Anne of Avonlea
Anne of the Island
Anne's House of Dreams

Elisabeth Gaskell
Cranford
Wives and Daughters

Sarah Jewett
A Country Doctor

Geoffrey Chaucer
Canterbury Tales

P. G. Wodehouse
Carry On Jeeves

Hugh Lofting
The Story of Dr. Dolittle
The Voyages of Doctor Dolittle

Anne McCaffrey
Dragonflight
Dragonquest
Dragonsdawn
Moreta
The Renegades of Pern
The White Dragon

F. Scott Fitzgerald
Flappers and Philosophers

John Galsworthy
Forsyte Saga

Sir Walter Scott
Ivanhoe

Holly Black
Spiderwick Chronicles

Thomas Hardy
The Mayor of Casterbridge

Charlote Brontë
The Professor

It is not a substitute for real reading, and it's a lot slower than the pace I normally go through a work, but I love how the audiobooks help me fill an otherwise unproductive (but substantial) chunk of my day.

Thursday, November 20, 2008

Pilgrim Dresses


Wednesday night was Thanksgiving night at the FrontLine Club meeting that the girls attend. As you can see, they were Pilgrim girls.

The dresses were designed as a simple gathered skirt dress with a Peter Pan collar. The patterns were generated by Wild Ginger Child's Play v4. The aprons were my own design (I mean, who needs a pattern for an apron?) The coifs were from Margo's Patterns. Jennifer did the blackwork embroidery from patterns she searched up on Google.

The girls were very pleased, and they ended up being the only two pilgrims in a whole room full of Natives ...

Tuesday, June 24, 2008

Yard Ornaments for the 21st Century

In a recent Reuters article, a woman brought in something unusual to the local police; a live hand grenade, still in its packaging.

This brings up two questions:
  • Exactly what is the original packaging of a hand grenade? Do they shrink wrap them? Maybe a nice paperboard box with acetate windows to allow the buyer to thoughtfully consider the aesthetic virtues of their proposed anti-personnel device purchase? Does it come in a special bulk-purchase package for warehouse club markets? Does it carry a UPC code?
  • In the article, police spokeswoman Patrycia Chalupczynska commented that It is quite unusual for someone to find a grenade in their backyard, especially one that hasn't been spent (bold emphasis mine). This implies that while finding live grenades is rare, finding the fragments of a grenade explosion is rather less so.


I guess this tells me that gang warriors in Edmonton must be utilizing distinctly heavier firepower than the poseurs here in the States.

Thursday, September 13, 2007

Turkey Lasagna

Attribution: Original recipe from Albertson's email


Ingredients

1 cup onion -- chopped
1 cup bell pepper -- chopped
1-1/4 pound ground turkey
2 tsp dried Italian seasoning
1 can diced tomatoes
1 can tomato sauce
15 oz cottage cheese
10 oz shredded Mozzarella cheese
about 12 lasagna noodles


Directions
Preheat oven to 400 degrees.

Saute onion and pepper together. Add turkey and cook until browned, about 5 minutes. Add Italian seasoning, diced tomatoes (including the juice from the can) and tomato sauce; stir to combine and bring to a boil. Remove from heat; add salt and pepper to taste.

In a bowl, mix cottage cheese and 8 oz of the Mozzarella cheese.

Spray pan with non-stick spray and spread 1 cup of the sauce on the bottom. Add 3 noodles on top of sauce. Spread 1/2 of cottage cheese mixture on top of noodles. Put 3 more noodles on top of cheese, then 3 cups of the sauce on top of those. Again put 3 noodles onto the sauce and the rest of the cottage cheese mixture on that. The last 3 noodles follow, and then the rest of the sauce.

Sprinkle the remaining Mozzarella on top.

Place in oven and bake for 45 minutes, or until the cheese is browned and the lasagna is hot and bubbly. Let pan sit for 10-15 minutes before serving, if you have the patience to accomplish that.

Tuesday, September 11, 2007

The Leader Passes

Flowers from the Mintos


Monday night I served as the family representative at the funeral home, welcoming a number of good friends that wished to express condolences in person. This turned out to be a very comforting experience, for reasons that I have not been able to yet ascertain. During the lulls in the stream of visitors, I took the opportunity to snap pictures of the flowers that had been sent. These are scattered throughout this post.

Flowers from the McDuffs, Hesters and Clarks

Daddy's funeral turned out to be a beautiful affair. The clouds and showers of the previous day passed on, leaving a fresh and clean world in which we could celebrate a man that we loved.

We chose a wooden casket for his body, since he so loved to work with wood.

In the church

Pastor Rice spoke of Daddy as one who was quiet and steadfast, depending on his Hope, and trusting naught else. The central verse was 1 Thessalonians 4:13-19


Flowers from the Loveland Jones family

Julie Mowen sang a beautiful solo, the highlight of a song service that included a number of congregational hymns as well. Rock of Ages, In the Garden and Amazing Grace, among others.

Flowers from Jennifer's Family

Abigail bore the proceedings stoically, but Brianna cried five or six times; whispering each time that she missed her Papa. Of course, her Daddy cried right along with her.

Flowers from Pam and David

We carried Daddy out of the church and into the bright Colorado sun and put the coffin into the hearse. It was a short ride to the Berthoud Cemetery, where the Town Clerk had picked a site near a number of other Jones ... and also a couple Clarks! This little bit of trivia provided a touch of amusement amidst all the mourning.

At the cemetery

And with a few brief words, the task was complete. Farewell, Father, on your journey with the Saviour. I will be seeing you.

Friday, June 15, 2007

Slow news day

It's got to be a slow news day ...

In this story, Reuters sees fit to cover the startling fact that the bars of San Antonio are not seeing an uptick in business during the in-town visit of the Southern Baptist Convention. No, really; this is unexpected!

In other news, researchers conclude that heavy water consumption results in increased usage of restroom facilities. Representatives of American Standard and Aquafina were unavailable for comment.

Monday, November 13, 2006

Mission accomplished

Saturday November 4th was going along nice and quiet. Getting things done around the house and taking in some reading. Then, in came a new mission:

My wife: "Well, I'm doing something different"
Me: "What?"
Wife: "My D.A.R. Chapter wants me to be in the Veterans Day parade next week."
Me: "Sounds fun, what are you going to be doing?"
Wife: "Just walking in the parade, except I dress up in a "Colonial" dress."
Me: "Where are you going to get that?"
Wife: "They have ones available, oh and they want the girls in it as well."
Me: "In costume?"
Wife: "No, just dressed patriotic"
Me: "Okay, so what's your plan?"
Wife: "I have no idea ..."

So, the task was set. Create a patriotic outfit for two little girs to wear while riding a float amongst a bunch of ladies dressed in outfits that are supposed recall the fashions of two hundred years ago. And, we have one week to do it.

Halloween being just over gave me my first inspiration. My eldest daughter had been "Cinderella", which to her meant, "make me a blue dress". That was easy as I had a pattern already on hand for something appropriate. (http://users.frii.com/charlesj/charles/projects/crw_1098.jpg) This would form the foundation.

Next, we headed off to JoAnn's to check out any leftovers from Independence Day. We struck gold with some cotton print with a flag motif in the $2 rack. I added a couple yards of lace, just in case.

Getting home, it was time to get creative. I wanted to lengthen the bodice down to the natural waist instead of the empire waist in the pattern. Then we needed to add long sleeves (too cold for bare arms) and add a contrasting collar to make the whole thing less overwhelming around their face. I'm not really sure what I'm doing at this point, but I lay out the original pattern pieces on some butcher paper and start drawing lines where I think they should go. By Saturday night, I have a pattern.

Sunday was church, cleaning house and football, but a little bit of time was available to get one bodice cut out and sewn up to prove that it fit. It did. Adding sleeves to the bodice proved that I was one the right track there also. Still, I had nothing for the collar. I cut out a square and sized it to look okay. Then laid out the bodice pattern pieces and figured out what the neck opening should look like. I tried the result on my youngest and seemed okay. Cut two pieces, add lace, sew up, attach. Hey! It works! Whoa. (In hindsight, I should have added some interfacing to the collar to give it more body. Oh well)

Once the week was underway, time became precious. Between work, home school and sleep, there’s not a lot left for creativity. I put my wife to work cutting out skirt panels, whilst I got the second bodice and sleeves together. By Friday, I was hemming skirts and sleeves and the girls were going wild with anticipation. We had done it.

Tuesday, February 14, 2006

Half-circle skirt redux

Now, once I finished the half-circle skirt for my daughter, my wife liked it so much that she had to have one herself. In this case she wanted something a heavy, dark fabric. Once again the clearance rack at WalMart came through, producing a medium weight black denim at $1.00 per yard. On a hunch that this might prove popular, I went ahead and bought ten yards. Oof. I forgot that denim is heavy ...

Getting cocky after the success of the pink skirt for my daughter, I tried to take shortcuts on this skirt. Naturally, those shortcuts turned into time sinks that stretched the effort far beyond what it needed. First I cut the waistband too narrow, and didn't have sufficient seam allowance to make a good connection. Then I cut the second waistband 2 inches too short ...

At this point I laid my head on the table, took a deep breath, and broke for lunch.

After lunch everything was much clearer, and we got a proper length waistband put on the skirt. There were further challenges such as the elastic escaping from the pins before getting tacked in place, but we got 'er done.

It turned out well, and in fact we received two compliments the night she wore the skirt for the first time. Posted by Picasa

Getting assistance

In any endeavour, it is nice to get assistance in your work. However, the assistance I get from my sewing helper is a little less useful than most. For whatever reason, E'la (pronounced ee-la) the kitten is fascinated with the moving needle of the sewing machine. She hops right up and gives it close inspection anytime that I have an unusually long seam. Posted by Picasa

Sunday, February 12, 2006

Half-Circle Skirt

My first attempt at a circle skirt, this one for my youngest daughter. She loves skirts that twirl, and can never have enough of them. Actually, this is a half-circle skirt.

No pattern involved, after all who needs a pattern for a half-circle skirt?! :-) The fabric was a nice, soft handed pink woven cotton/poly blend that floated well; very important when twirling. It was on the $1 table at Wal*Mart, so I couldn't go wrong even if things did not work out.

Attaching the waistband was one trick I learned, after making the mistake of trying to merely roll over the waist section of the circle on the muslin test item. I mentioned the difficulty to Mom and she set me straight.

Then I learned how to use the blind hem stitch on the sewing machine while hemming the thing. Not the most obvious technique around, let me tell you, but Kate Dicey's page on using the Blind Hem Stitch was a great help!

In the end, my daughter loved the skirt, she can twirl to her heart's content, and it brightened what was otherwise a troublesome weekend as she got over her wintertime cold. Posted by Picasa

Tuesday, August 30, 2005

Useless Perforce Error

In my work existence, I support the Perforce Source Code Management (SCM) tool. Occasionally, I find examples of error messages in Perforce that tell you nothing about what is wrong. I will try to enumerate those here as I find them.
  • must sync before integrating — One occasion that this message shows up, is when the user is attempting to branch a file, but both the source and destination depot locations are mapped by the client spec to the same client location. This creates a name collision, hence the error. Obviously, this can only happen in a client spec using plus mappings. The solution is to either temporarily remove one of the mappings, or to have a reserved "branching" client spec sitting around that you use just for these kinds of occasions. The branching client would contain a single mapping //depot/... //client/... and be free from collision issues.

Thursday, July 28, 2005

End result

Well, in the end it didn't buy me much. You can see the results in the data:


There were no bad side-effects throughout the trial. I never felt nervous, had head-aches nor experienced hot-flashes; all things that other diet pills have done to me in the past.
But, at the same time I didn't appear to gain any benefit either. The weight continued to fluctuate within the same band as before, and the body fat percentage was equally unchanged.
So the conclusion is, for me at least, that Chitogenics does neither harm, nor good.

Monday, June 06, 2005

So far, so good

So far, so good. Three days in and there have been no bad side-effects. Back in 1998 I tried Metabolife 360, one of the formulas then available that used ephedra. It increased ones metabolism by hyping you up to the moon. I am a person that does not get hyped up easily. Caffine usually does not effect me at all; I down several cups of coffee in the morning without a problem. Ephedra, however, was wild. It made me nervous, warm, touchy and gave me bad breath. :-)
This stuff, though, does not seem to be doing any of that. With a couple days under my belt, I am noticing that I am not as hungry as usual. I have not yet cut back on my meals any, but I have been eating the normal amount out of force of habit rather than hunger. I think it is time to rectify that, so today I am taking the approach of eating just enough to get rid of the hunger pangs.
Also, I added one new item to my exercise ritual. I am now doing thirty crunches while holding a 15 pound weight and lying on a 75cm exercise ball.

Sunday, May 29, 2005

Getting started

For some reason my weight has been going up. Okay, I know why it goes up; intakes exceeds expenditure. That's not my point. My point is that I cannot identify what change has taken place that would lead to such results.
I am an engineer. That means I am way too liable to track and chart things. That includes my weight. And body fat. Body fat? Yes, I use an Marshall Omron Body Fat Analyser HBF-306 to track that. I an Epinions review available of this device, if you're interested. Anyway, I have charts of my weight and body fat going waaaay back, but for the purposes of this experiment we only need fall back to late last year.
Here is the weight chart:

And the body fat percentage chart:

You can't see it from this, but things were pretty stable up until late November. Then we see a jump in weight (though not body fat, oddly enough) over the next month (duh, Thanksgiving and Christmas, the Twin Terrors of Weight Control). Then a gradual decline through mid-February back to the same range as before the holidays.
About this time, our treadmill broke. The motor gave out. I don't think it liked a 200 pound dude jogging on it. Anyway, it quit and for a while I went back to an exercise bike. "A while", like one week. We ended up buying a Vision Fitness HRT X6200 Elliptical Machine.
It took me a while to figure out equivalent exercise routines on the new machine that matched what I had been doing on the treadmill. The routine I finally settled on means I exercise five times a week. Monday and Friday I run an interval program called Sprint 8. This is an interval cycle based on Phil Campbell's Ready, Set, Go! Synergy Fitness. For more information you can visit this page at Vision Fitness. Tuesday and Thursday I do an 80% of maximum heart rate cardio workout. Wednesday is a 70% of maximum heart rate fat burning workout.
Unfortunately, while I was figuring this out, my weight went up. From a running average of 207.5 to a running average of about 211. Worse, my body fat reading showed this to be true weight gain, as my average body fat percentage rose from 19.4% to 21%. Not good, we need to do something.
On the radio I have heard advertisements for Chitogenics featuring Tom Martino. Now Tom is a little over-the-top for me, but I respect the reputation that he has developed. So it lent quite a bit of credence to the advertisement that he would endorse a product. That endorsement set this product apart from the typical late-night TV advertised diet pill. I decided to give it a shot.
It is not cheap. However, I figured that I would order enough for one month, try it, track the results, and write about the experience here. This would help fill the gap of Internet information on Chitogenics. Anyway, I ordered it Saturday May 28th. We will see how long it takes to get here.

Tuesday, January 25, 2005

Flooring

Now for the big job, putting in 1,000 square feet of flooring. For a couple years I had been keeping my eye on some new products for installing flooring over concrete. Two competitors existed, SubFlor and DriCore. These are two-foot square flakeboard pieces with plastic "feet" to hold them up above the concrete surface.

The plastic feet provide a dead air space under the sub flooring, helping with insulation. The plastic provides a vapor barrier effect as well. In addition, if a minimum amount of water should leak in, the lift of the feet will provide a place for that water to work its way to the floor drain. However, understand that we are talking very small amounts of water! Nothing is going to be much help if you have the Mississippi river coming in your window.
We ended up going with DriCore mainly because of superior distribution. When we contacted SubFlor, we learned that the product was not yet in the local Lowes stores, but would be "soon". What soon meant was not clear. When I talked with DriCore, they also revealed that the local stores did not yet have product, but they immediately put me in contact with a Home Depot in Nebraska that would ship it to me. Shipping was a little high, but I really wanted to use this since I intended to lay down bamboo flooring.
The DriCore instructions actually suggest that you install the product on the floors first, and then build your walls on top of it. That does not work well here in Colorado, since our expansive soils demand the construction of floating walls. What this meant to me was that I had to cut the DriCore to get it through doorways and such

Kind of a pain, and certainly time consuming. However, a jig saw with an aggressive tooth profile cuts both the flake board and the plastic subsurface just fine.
The edges of the panels are tongue and grooved. A simple blow from a rubber mallet would drive the panels together, locking them quite tightly.

I used a small scrap stick to keep from hitting the panel edges themselves. I figured that the blows could not be helpful for the tongues!

You can see some odd panels up against the walls on the edges of the room. The instructions called for a 1/4" gap between the edge of the drywall and the edge of the DriCore. I accomplished this gap by placing these scrap bits of 1/4" hardboard as shims.

Basement - Bamboo planks

After the DriCore, I began installing the bamboo flooring. I purchased the planks from BuildDirect, who had the best prices I could find. You had to purchase a minimum order of 1,200 square feet, but that was about what I needed and the cost, even with shipping, was 30% less than the local supplier.

Bamboo is available in two colors, a yellow that is similar to maple, and a brown that seems like a dirty white oak. Bamboo is too dense to stain well, so they create the dark brown color by heating the wood until it begins to char, then stopping. They call this "lightly toasted" treatment carbonizing. However, that word apparently doesn't translate well from the Chinese.

I installed the bamboo with an air powered flooring nailer.

The work went pretty fast, this was the results of the first hour
.
The highlight of this bit was for my daughters. The boards were small enough that they could help lay them out for Daddy, a task that they loved.


But by the end of the day, they'd had it!

Hey, this place is looking finished!

Wednesday, January 12, 2005

How to create an "airbrushed" look

How to create an "airbrushed" look
  1. Load your image into PaintShop Pro
  2. In the Layer window, right-click on the image and select "Duplicate"
  3. With the new layer selected, right-click in the Layer window and select "New Mask Layer", "From Image", select "Luminance" as the Source and then OK.
  4. Right click in the new mask group and select "Merge", "Merge Group"
  5. With the merged mask layer selected, go to "Adjust", "Blur", "Gaussian Blur". You will need to play with the amount of blur to get the effect you want. It varies based upon the size and pixel density of the photo you are dealing with as well as the strength of the effect you desire. For the six megapixel images from my Canon 300D I like to use a radius of 6. Enter the amount you want and hit OK.
  6. If you stopped here, the image looks out of focus. That's really what the airbrush technique is all about, reducing the sharpness to smooth out detail in a photo. But, lack of sharpness is disturbing to the viewer. The trick is, only certain important areas need to be sharp, to give an impression of good sharpness overall.
    When it comes to photos of people, we look at faces. In particular, we zero in on eyes and the mouth. Sometimes our attention may be drawn to other spectacular accessories, such as jewelry. We need to keep these elements sharp, while retaining the pleasant smoothing blur in all other regions.
    To accomplish this, make sure you are still on the blurred layer and select the Eraser Tool. Choose a round shape, a size appropriate to the areas you are working with and a hardness of about 30. Zoom in to help you maintain high precision. Carefully erase the blur in the areas of the eyes and lips.
  7. Now return to the layers menu. For the layer with the blurred image, select the Opacity slider and move it down to around 65%. This will reduce the impact of the blurring until you end with just the impression of smoothness.
  8. Inspect the photo. Determine if there are other elements of the picture where blurriness is detracting from the composition. In those areas use the Eraser Tool again to wipe out the blur effect.
This article adapted from information posted to rec.photo.digital by Tom Nelson. See the original article here